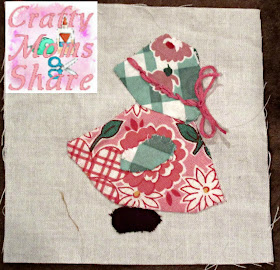
Awhile ago I posted about making a quilt for Kit Kittredge. Kit is the American Girl from the 1930's/the Great Depression Era. In my post I explained I was having difficulties with the dresden plate quilt block and getting it the correct size. I decided to just make Sun Bonnet Sue squares. I started making them and at some point put them away and now I have to find them. However this weekend my interest was renewed because Hazel had her first sleepover Friday night which has turned into a weekend guest including her American Girl doll, Ruthie. Ruthie is Kit's best friend in the stories, so we have been having lots of doll fun including a trip to the American Girl Store today. However my depression era interest is back. Now awhile ago I discovered Wren Feathers has an easy dresden plate doll quilt pattern on her site. If you look up dresden plate quilts you will see three styles or so of dresden plates. Wren Feathers is the one that is just a circle. I did some more research and finally figured out what I needed to do to make my pattern. I found The Quilting Company's article to be very helpful in sizing of them. I wanted to make one with the scalloped edge and I figured it out!!
I still need to applique them onto the 4.5-inch squares but love that I can make them now!! The other common style has points instead of the scalloped edge. I also made a template for them.
So I decided to use only eight wedges since the squares are only 4.5-inches. To figure it out I divided 360 degrees by 8 and of course got 45 degrees. I drew a line and then measured 45 degrees from it and made a v-shape. I cut it out and folded it in half and cut the point or rounded edge making them about 1.5-inch. Then I drew a quarter-inch seam allowance around the edges. I also made a 1.25-inch circle for the center. You can download the template here. When printing make sure the line is one-inch long for the correct scale.
To make the blocks, cut out eight wedges of your choice. Sew them together to form a circle. Then hand-applique the circle folding under about 1/8-inch of the circle to the center of the piece. Then sew the entire plate onto a 4.5-inch square. There is a quarter-inch seam allowance to fold under as you applique. Then you can decide how to arrange your squares. I am using 1930's reproduction fabric. I am thinking I will alternate the dresden plate with the sun bonnet Sue squares with a sashing inbetween.
 |
| One of My Sun Bonnet Sue Squares |
It is time to see what you have been creating! Thank you to everyone who shared with us at our last party. It was a fun party with lots of creativity shared! Below are a few of the features from our party. Please remember for your child-oriented crafts, activities, lessons, etc. Sharing Saturday is going on!! We are back to weekly Sharing Saturdays now!! be sure to stop by and share your kid-oriented activities!! I can't wait to see what your latest creations!!
Features
1) From Everyday Parties: Super Easy Game Night Backdrop
2) From The Handyman's Daughter: How to Make Kokedama (Japanese Moss Ball)
3) From Fivespot Green Living: Fun Printable Unicorn Quotes
4) From Flamingo Toes: Spinning Spiderwebs Mini Quilt
5) From Clean and Scentsible: Ruffled Felt Pumpkins
6) From Anita's DIY Life: How to Make Concrete Pumpkins Without a Mold
7) From Rain on a Tin Roof: Five Free Fall Mums Watercolor Printables
8) From The Style Safari: 3 Fashion Forward Upcycling Projects
9) From In Our Pond: Miniature Paint and Glue Bottles (Barbie Sized)
Thank you to everyone who shared the last week!! I hope you will share again!! If you are featured here, please feel free to grab a featured button to display proudly on your blog. I would love the help spreading the word about Crafty Weekends!!


No comments:
Post a Comment
I love to hear your comments and ideas. Thank you for reading and contributing!